<Android>1 Android 概述
本文最后更新于:2025年10月17日 晚上
1 Android 概述
Android 是一个以 Linux 为基础的开源操作系统,主要用于智能手机和平板电脑等移动设备。
2003 年,Andy Rubin 创建了 Android 公司。该公司于 2005 年被 Google 公司收购。Android 操作系统的发展离不开 Google 公司的研发和开放手机联盟的推动。
2008 年 9 月 23 日,Google 发布了 Android 1.0,这是一个稳定版本。之后,10 月 22 日,第一款 Android 手机 T-Mobile G1(HTC Dream)于美国上市,由台湾宏达电子公司(HTC)制造。
Android 的特点
-
真正开放性
Android 是一个真正意义上的开放性移动开发平台,其同时包含 底层操作系统(Linux)以及 上层用户界面 和 应用程序,且不存在任何以往阻碍移动产业创新的专有权障碍
-
应用程序相互平等
所有 Android 应用程序间完全平等,所有应用程序都运行在一个核心引擎上,这个核心引擎就是一个虚拟机。其提供了一系列用于应用程序和硬件资源间通信的 API
-
应用程序间沟通无界限
Android 平台下开发应用程序,可以方便实现应用程序间的数据共享
-
快速方便的应用程序开发
Android 体系结构
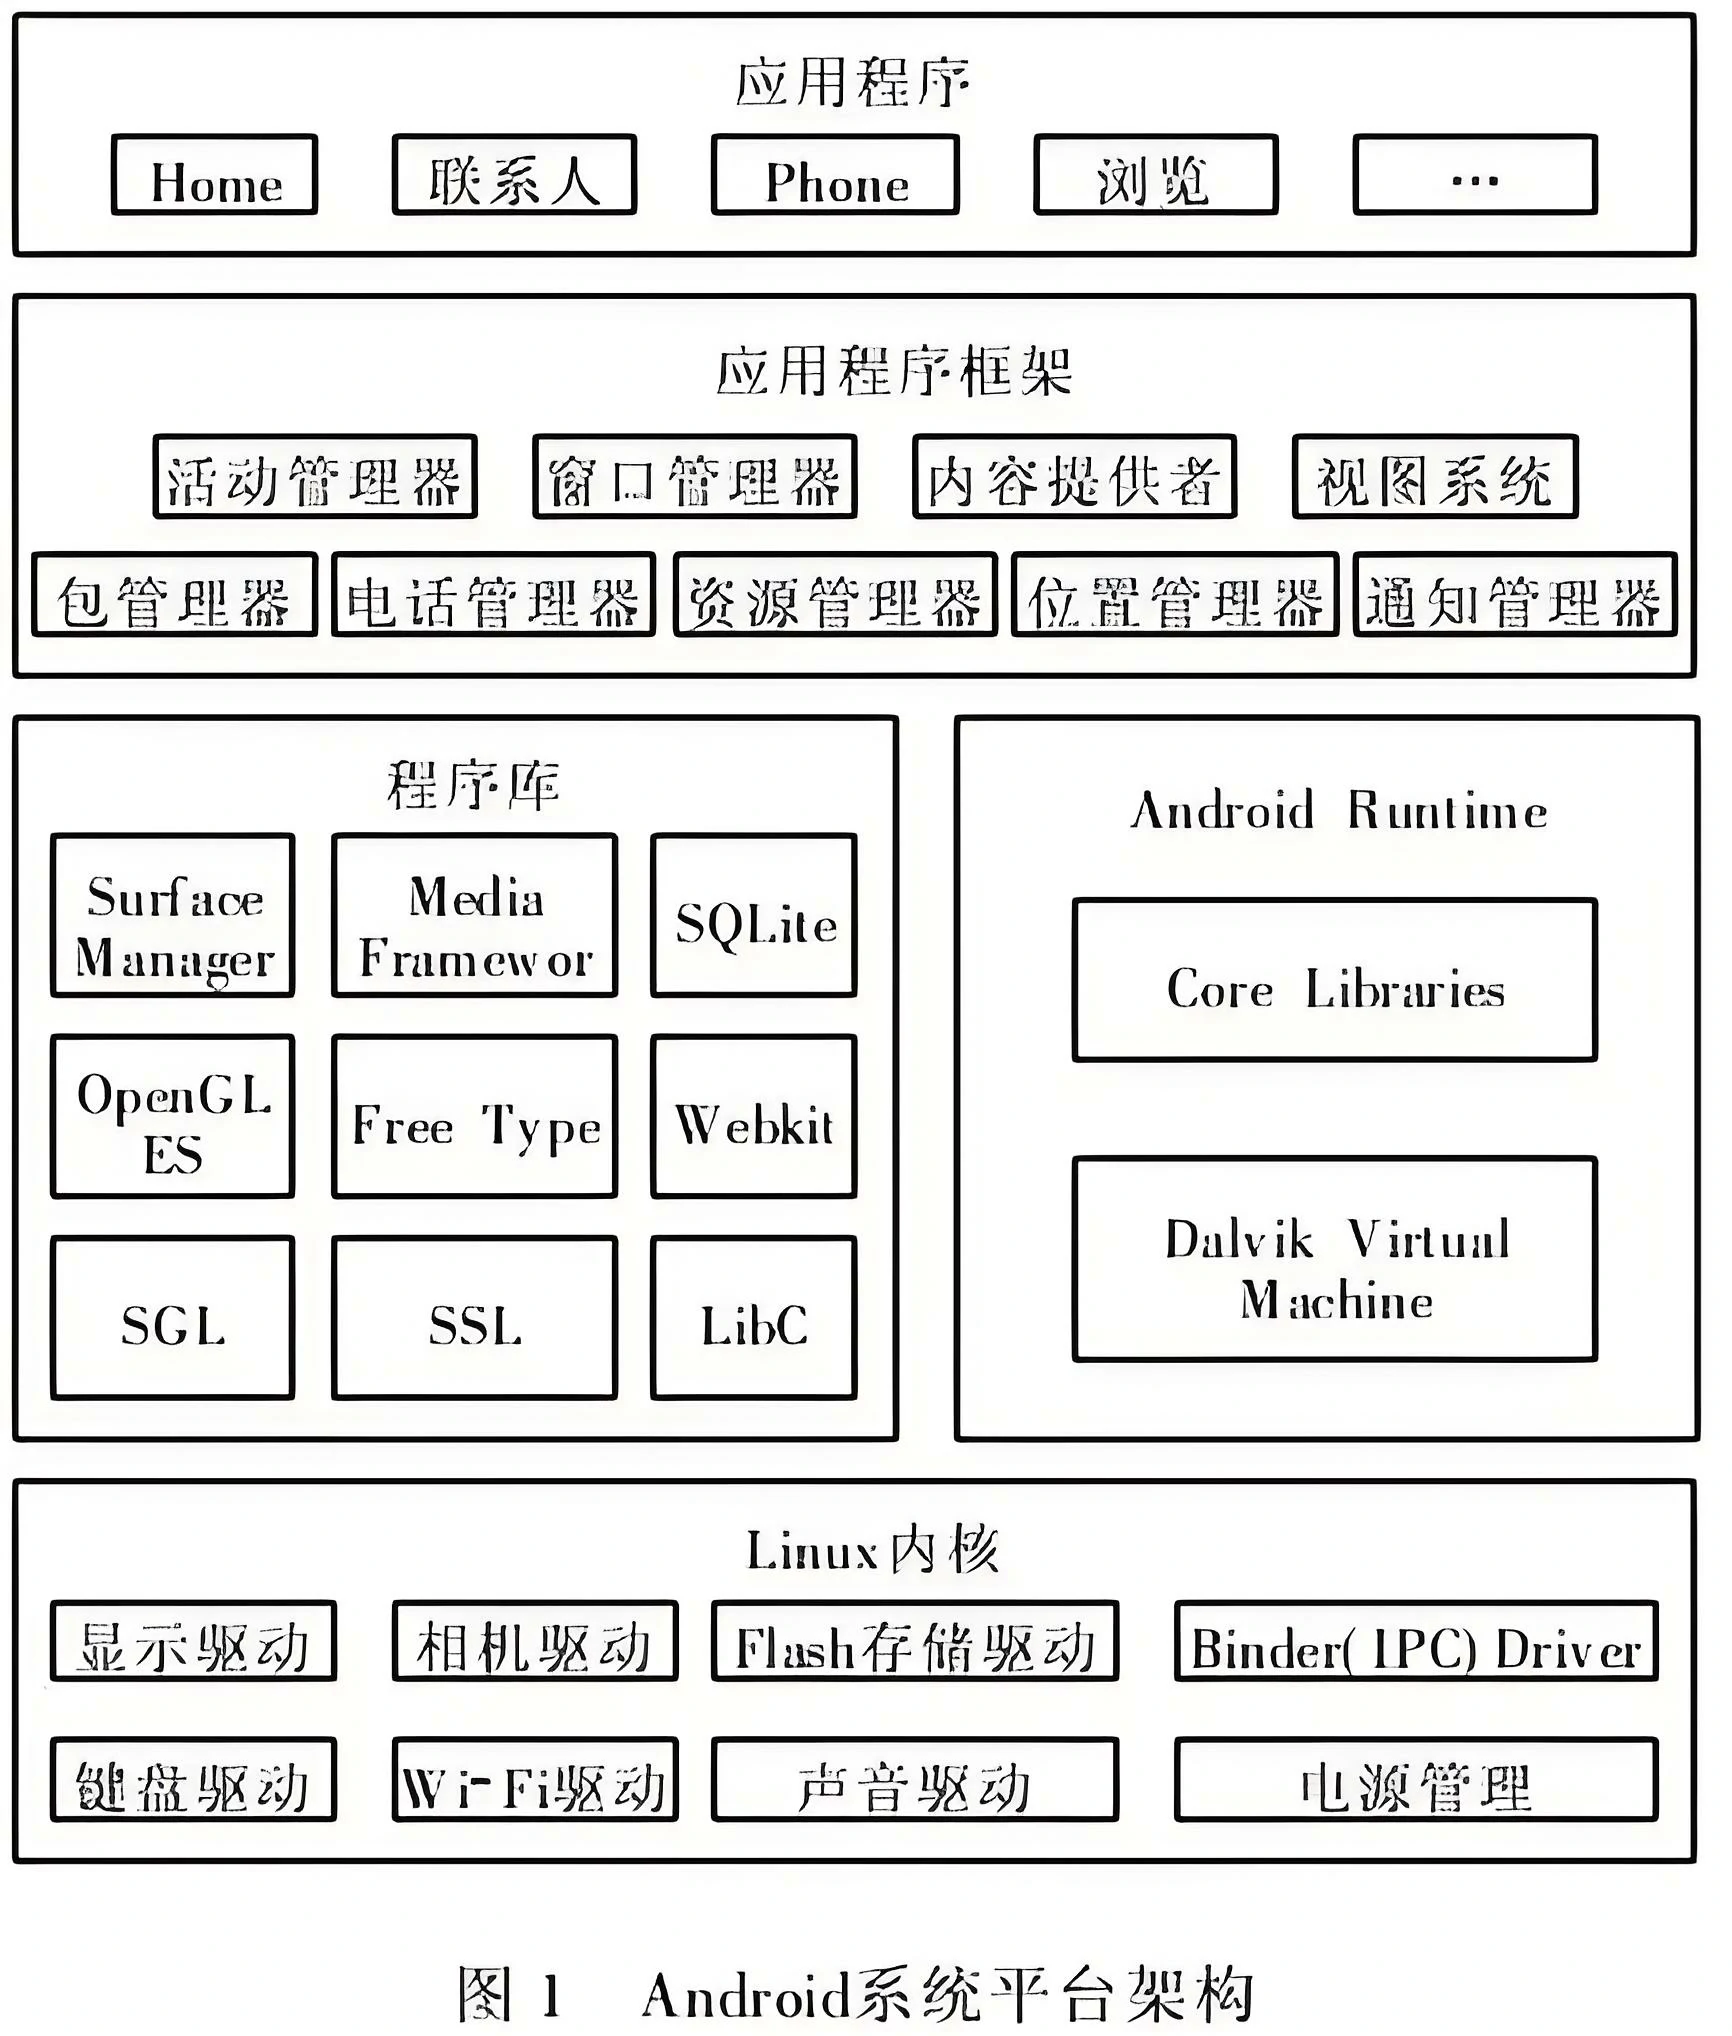
Android 是基于 Linux 内核的软件平台和操作系统,采用了 HAL(hardware abstract layer,硬件抽象层)架构,主要分为四部分:
-
Linux 核心层
以 Linux 内核工作为基础,由 C 语言开发,只提供由操作系统内核管理的底层基本功能
-
中间件层,也称 Android 运行库层
包括 函数库Library 和 Android运行时,由 C++ 开发
-
应用程序框架层
提供了 Android 平台基本的管理功能和组件重用机制
-
应用程序层
提供一系列核心应用程序,包括通话、短信等。应用软件由各公司自行开发,以 Java 作为编写程序的一部分
Android 项目结构
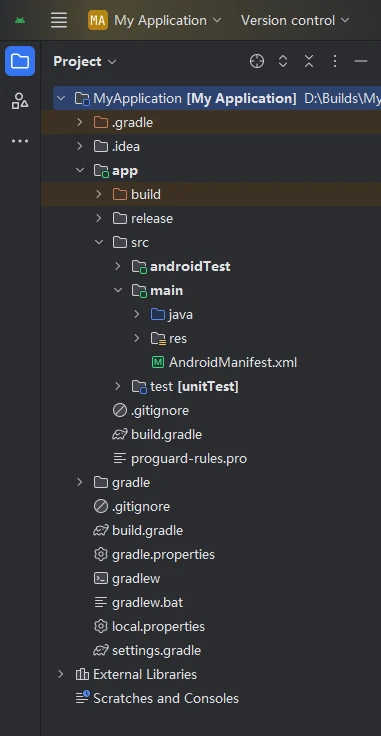
- .gradle:gradle 编译系统。其版本由 wrapper 指定
- .idea:Android Studio IDE 所需的文件
- app:当前工程的具体实现代码
- build:编译当前程序代码后,保存生成的文件
- gradle:wrapper 的 jar 和 配置文件 所在的位置
- build.gradle:实现 gradle 编译功能的相关配置文件
- gradle.properties:和 gradle 相关的全局属性设置
- gradlew:编译脚本,是一个 gradle wrapper 可执行文件
- gradlew.bat:Windows 系统下的 gradle wrapper 可执行文件
- local.properties:本地属性设置
- settings.gradle:和设置相关的 gradle 脚本
- External Libraries:当前项目依赖的 Lib,在编译时自动下载
- AndroidManifest.xml:配置文件
- java:存放开发人员编写的 Java 源码文件
- res:存放项目中的所有资源,包括图片文件(drawable)、布局文件(layout)、图标文件(minimap)、数据文件(values)
Android 开发四大组件
-
活动(Activity)
Android 中,Activity 是所有程序的根本。所有程序的流程都运行在 Activity 中
一个 Android 应用由多个 Activity 组成,这些 Activity 间可以互相跳转
-
服务(Service)
Service 与 Activity 类似,但不能自己运行,只能后台运行,且可以与其他组件交互。Service 是没有界面的长生命周期的代码
-
广播接收器(BroadcastReceiver)
在 Android 中,Broadcast 是一种广泛应用的 应用程序间通信 的机制
-
内容提供者(Content Provider)
是 Android 提供的第三方应用数据的访问方案
1.1 活动 Activity
Activity 是 Android 的四大组件之一。用于显示用户界面和处理交互事件。
一个 Android 应用由多个 Activity 组成,这些 Activity 间可以互相跳转
使用 Activity 之前,必须在 AndroidManifest.xml 中进行配置:
<manifest...>
    <application...>
        <activity
            android:name=".MainActivity"
            android:exported="true">
        </activity>
        <activity.../>
        <activity.../>
    </application>
</manifest>
在上述位置中进行配置时,可以添加属性
| android:name=".MainActivity" | 指定名称。 需要是某 AppCompatActivity 派生类的类名 |
| android:screenOrientation="landscape" | 指定屏幕方向。不设置时屏幕可旋转 landscape:横屏 portrait:竖屏 |
| android:launchMode="standard" | 指定启动方式。详见 [1.1.3 Activity 的启动方式] |
1.1.1 Intent
Intent 主要用于 Android 组件间的通讯。将必要的数据和描述附加给 Intent 后,Android 会根据相应描述,将 Intent 传递给符合条件的组件,以完成对该组件的调用。
Intent 分为两种模式:
-
显式 Intent:明确指定要启动的组件名称
Intent intent = new Intent(this, ActivityName.class); startActivity(intent); -
隐式 Intent:只给出要启动的组件的特征
Intent intent = new Intent(Intent.ACTION_CALL);
startActivity(intent);
Intent 不仅可以启动 Activity,也能启动 Service 和 Broadcast。其方法如下
| Activity | stratActivity(intent) |
| Service | stratService(intent) bindService(intent) |
| Broadcast | sendBroadcasts(intent) sendOrderedBroadcasts(intent) sendStickyBroadcasts(intent) |
参数传递
可以通过 Intent 进行参数传递。被调用的组件使用 getIntent() 方法先获取 Intent,再调用下列方法以获取参数
| Intent putExtra(String name, V value) | 向 Intent 中附加名为 name 的基本类型参数 |
| String getStringExtra(String name) int getIntExtra(String name, int defaultValue) ... |
从 Intent 中取出指定的字符串参数 从 Intent 中取出指定的 int 参数 ... |
也可以通过 Bundle 对象来传递参数。使用 Intent 传参的本质就是使用 Bundle 传参,其传参方法也是大同小异。
Bundle 对象附加、取出参数的方式与上述 Intent 方法相似。此外,可按下列方法附加、取出 Bundle 对象。
| Intent putExtras(Bundle extras) | 向 Intent 中附加一系列参数 |
| Bundle getExtras() | 从 Intent 中取出参数列表 |
参数回传
若需要被调用组件进行参数回传,需要进行如下操作
-
通过
startActivityForResult方法跳转页面Intent intent = new Intent(this, ActivityName.class); ... startActivityForResult(intent, 100); -
重写调用组件的
onActivityResult方法。该方法用来处理回传参数@Override protected void onActivityResult(int requestCode, int resultCode, Intent data) { ... } -
被调用组件返回时,将参数放入 Intent,并调用
setResult方法Intent res = new Intent(this, ActivityName.class); ... setResult(RESULT_OK, res);
1.1.2 Activity 的生存周期
Activity 的生存周期主要由以下 7 部分组成:
-
onCreate:被创建。在 onCreate 方法中,通过
setContentView(R.layout.xxx)方法加载布局文件onDestroy:被销毁。在代码中,调用
finish()方法即可销毁该 Activity从 onCreate 到 onDestroy 的过程就是 Activity 的完整生存期
-
onStart:即将可见
onStop:不可见。之后,,Activity 进入停止(Stop)状态。
从 onStart 到 onStop 的过程是 Activity 的可见生存期
-
onResume:可见可交互(有焦点)。之后,Activity 进入活动(Active)状态。
onPause:可见不可交互(失去焦点)。之后,Activity 进入暂停(Pause)状态。
从 onResume 到 onPause 的过程是 Activity 的前台生存期
-
onRestart:重新可见。当且仅当调用过 onStop 后,在再次调用 onstart 前会调用 onRestart
(1_1_Activity生命周期图)
1.1.3 Activity 的启动方式
Activity 的启动方式有以下四种:
-
standard
默认启动模式。每当启动一个新的 Activity,原先的 Activity 就会入栈。
不论该 Activity 是否已在栈中存在,每次启动都会创建一个新的实例
-
singleTop
启动新的 Activity 时,若栈顶为该 Activity,则使其出栈并使用,而不是创建新实例
-
singleTask
启动新的 Activity 时,若栈中存在该 Activity,则不断使 Activity 出栈,直到将目标 Activity 出栈并使用
-
singleInstance
使用新的返回栈来管理该 Activity
在 AndroidManifest.xml 中,为 Activity 设置 launchMode 属性,即可指定启动方式
调用 Intent 的 setFlags 方法即可设置启动标志
Intent intent = new Intent(this, ActivityName.class);
intent.setFlags(Intent.FLAG_ACTIVITY_CLEAR_TOP);
Intent 启动标志的取值如下所示
| Intent.FLAG_ACTIVITY_NEW_TASK | 开辟新任务栈 |
| Intent.FLAG_ACTIVITY_CLEAR_TASK | 每次跳转后都将清空任务栈。必须搭配 FLAG_ACTIVITY_NEW_TASK 使用。 |
| Intent.FLAG_ACTIVITY_CLEAR_TOP | 与 singleTask 类似。但栈内的目标 Activity 出栈即销毁,之后创建新的 Activity 并使用。 |
| Intent.FLAG_ACTIVITY_NO_HISTORY | 与 standard 类似。但栈中不保存新启动的活动实例。 |
| Intent.FLAG_ACTIVITY_SINGLE_TOP | 等同于 singleTop 方式 |
1.1.4 Fragment
Fragment 是 Android 中的一个组件,其能嵌入到 Activity 中,以构建更灵活和模块化的用户界面
Fragment 可以在一个 Activity 中多次重用,也能在多个 Activity 间共享,同时支持在 Activity 中的动态添加、移除和替换。在适配不同大小的屏幕时,可以使用 Fragment 以实现灵活布局。
Fragment 与 Activity 相似,可包含布局和逻辑代码,也有自己的生命周期方法。
Fragment 分为动态加载和静态加载:
-
静态加载
在 Activity 的布局中直接添加 Fragment
-
动态加载
创建一个 android.fragment.app.Fragment 类的派生类,并重载其
onCreateView方法。public class MyFragment extends Fragment { @Override public View onCreateView(LayoutInflater inflater, ViewGroup container, Bundle savedInstanceState) { View v = inflater.inflate(R.layout.xxx, container, false); return v; } }之后,通过一个 FragmentManager 管理该 Fragment
MyFragment myFragment = new MyFragment();

FragmentManager manager = getSupportFragmentManager();				// 获取 FragmentManager
FragmentTransaction transction = manager.beginTransaction();		// 开启一个 Fragment 事务
transction.replace(R.id.xxx, myFragment);							// 将一个 Fragment 添加到容器中
transction.commit();												// 提交该 Fragment 事务
1.2 应用程序 Application
Application 是用于保存全局变量的基本类,其生命周期与应用程序相等。
Application 采用单例模式,这意味着同一应用程序的不同 Activity 都能获取相同的 Application。该特性使其可以为数据的共享、传递、缓存等提供便利。
要获取 Application,只需调用如下方法
| final Application getApplication() | 获取 Application 实例 |
在应用程序运行时,系统会自动创建一个 Application。也能通过修改 AndroidManifest.xml 文件以使用自定义的 Application 派生类。在其 application 标签内添加 name 属性,即可指定任意的 Application 派生类。
<application
    android:name="xxx"
    ...>
    <activity...>
</application>
只需在自定义的 Application 中建立 HashMap,即可便捷地传递信息。
Application 中有如下方法
| void onCreate() | 在 Application 创建时被调用 这一步的操作过多时会拖慢程序启动时间 |
| void onTerminate() | 在 Application 销毁时被调用 由于 Android 会尽量维持应用程序的运行,该方法有时不会被调用 |
1.3 服务 Service
Service 是 Android 四大组件之一。其可以在不依赖于用户界面的情况下运行,并且可以在应用程序被关闭后继续运行。多用于在后台执行长时间运行的操作或处理异步任务。
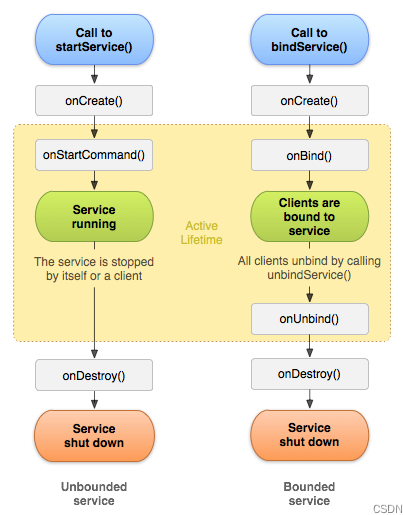
Service 有两种启动方式:
-
startService
通过该方法启动后,Service 将持续在后台运行。仅当外部调用 stopService 方法时才能停止服务
-
bindService
当调用者被销毁时,服务随之销毁。且调用者可调用服务的方法。
下面是 Service 的生命周期图,其指出了方法的调用时机。其中,onCreate 方法仅调用一次,而 onBind、onStartCommand 方法会依照 Service 的启动方法而调用。
1.3.1 在子线程中更新 UI
Android 的 UI 是线程不安全的。若在子线程中直接更新 UI 就会出现异常。
为实现在子线程中的 UI 操作,Android 提供了许多方法。
-
Handler 类
Handler 类允许我们将消息与任务发送到主线程关联的消息队列中。
首先,在主线程中创建 Handler 对象,重写方法
Handler handler = new Handler(Looper.getMainLooper()) {
    @Override
    public void handleMessage(@NonNull Message msg) {
        super.handleMessage(msg);
        if (msg.what == 1) {
            TextView tv = findViewById(R.id.title);
            tv.setText("通过 handler 更新");
        }
    }
};
之后,在子线程中向 Handler 对象发送消息,其将调用 handleMessage 方法以更新 UI
Message message = new Message(); message.what = 1; handler.sendMessage(message); -
runOnUiThread 方法
在子线程中调用 runOnUiThread 方法,可开启新线程以处理 UI 更新操作
runOnUiThread(new Runnable() {
    @Override
    public void run() {
        TextView tv = findViewById(R.id.title);
        tv.setText("通过 handler 更新");
    }
});
1.4 广播接收器 BroadcastReceiver
BroadcastReceiver 是 Android 四大组件之一。为方便各应用程序间以及应用程序内部的通信,Android 引入了广播机制。各应用程序可自行注册广播接收器,以接收特定类型广播。
Android 的广播分为两种:
-
标准广播
所有广播接收器于同时接到广播。广播传递不可被截断
Intent intent = new Intent("testtest"); sendBroadcast(intent); -
有序广播
广播接收器以优先级顺序(优先级相同时按注册时间顺序)依次接收广播,先接收者可截断后续广播
Intent intent = new Intent("testtest");
sendOrderedBroadcast(intent, null);
要接收广播,就要注册一个广播接收器。
首先创建一个 BroadcastReceiver 的派生类,并实现其 onReceive 方法
class MyBR extends BroadcastReceiver {
    @Override
    public void onReceive(Context context, Intent intent) {
        if (intent != null && intent.getAction().equals("testtest")) {
            Log.d("TESTTEST", "接收广播");
            abortBroadcast();					// 截断有序广播
        }
    }
}
之后,要注册该广播接收器才能接收广播。
注册广播接收器的方法有两种:
-
静态注册
在 AndroidManifest.xml 的如下位置添加如下语句
<application...>
    <activity.../>

    <receiver
        android:name=".xxxxxx"
        android:exported="true">
        <intent_filter>
            <action android:name="testtest"/>
        </intent_filter>
    </receiver>
</application>
该方式在 Android 8.0 之后,还需在发送时指定接收器的完整类名
Intent intent = new Intent("testtest"); ComponentName componentName = new ComponentName(this, "com.xxxx.xxxx.xxxx"); intent.setComponent(componentName); sendBroadcast(intent); -
动态注册
在主程序中动态注册广播接收器
MyBR myBR;

@Override
protected void onCreate(Bundle savedInstanceState) {
    ...

    myBR = new MyBR();
    IntentFilter itf = new IntentFilter();
    itf.setPriority(1);						// 设置优先级,将影响有序广播接收
    itf.addAction("testtest");
    registerReceiver(myBR, itf);
}

@Override
protected void onDestroy() {
    ...

    unregisterReceiver(myBR);
}


